Categories
Lifestyle Tips & Tricks

How To Lace Golf Shoes

Unlike mastering the game of golf, there’s nothing too complex about learning how to lace golf shoes. Simple, basic and traditional Over Under Lacing and a bow tie knot will do the trick. It’s an efficient, comfortable and time-tested way to hit the links.

Tie them once and you should be good to go for an entire round of 18 holes. However, there’s a chance that you, like many people, don’t tie a proper bow tie knot. So, if your laces keep coming undone as you’re on the approach, then be sure to check out the tip below.

LACING INSTRUCTIONS

When you’re learning how to lace golf shoes, follow these steps:

OVER UNDER LACING

Step #1
Start by threading your shoelace through the bottom eyelets until you have an equal amount of shoelace on each sid

Step #2
Thread the left and right laces across to the next eyelets, creating a diagonal “X” pattern. Continue pattern all of the way up.

Step #3
Take both laces, thread them and pull tight. Next, take the classic bunny-ear loop in one hand and wrap the other lace around the loop back towards you – rather than away from you.

Step #4
Pull loops tight. The bow should be straight across and perpendicular to the direction of the shoe.

You May Also Like:

Categories
Lifestyle Tips & Tricks

How To Lace Running Shoes

Before finding your stride, it’s important to know how to lace your running shoes specific to your gait and foot width. This step is especially valuable in lowering your risk of injury, not to mention chafing and blistering.

There are many methods but these six are the most common: Lydiard lacing, gap lacing, wide foot, narrow foot, diagonal lacing and runner’s loop (also known as heel-lock lacing). Each style offers a different level of support and comfort, so test them out and find what’s best for your foot.

In the end, this is how your running shoes should fit and feel 1) snug in the heel and midfoot with a little bit of wiggle room in the toes 2) when holding the shoe’s heel and raising your foot, there should be little to no movement 3) top eyelets on each side of the tongue should be parallel 4) tight fit that still offers comfort for reduced impact and increased stability.

LACING INSTRUCTIONS

When you’re learning how to lace running shoes, follow these steps:

LYDIARD LACING

Developed specifically to increase blood circulation to distance runners’ feet by relieving pressure. A helpful style if your shoes feel tight or binding.

lace running shoes

Step #1
Start by threading the lace through the bottom eyelets until there is an equal amount of lace on either side of the shoe.

Step #2
Run the left lace straight-up the inside of your shoe to the second eyelet, then lace straight across.

Step #3
Run the right lace straight-up the inside of your shoe to the third eyelet, then lace across.

Step #4
Continue this pattern of skipping eyelets and running the laces up through the inside of the shoe and straight across through the adjacent eyelet until complete. Finish with standard bow tie.

GAP LACING

This style is named for the “gap” in the middle of the shoe which accommodates high arches. It also increases ankle flexibility for trail runners or could be used to avoid a sensitive area. Note: The gap should be positioned wherever needed but the steps below outline directions for a high arch gap in the middle of the foot.

lace running shoes

Step #1
Thread the lace through the bottom eyelets until you have an equal amount of lace on each side.

Step #2
Thread the left lace through the right eyelet and the right lace through the left to create a diagonal “X” pattern. Continue pattern until you reach the area of your foot that needs more room.

Step #3
Run the right and left laces straight up the inside of the shoe for one or two eyelets, depending on how much room you need to create a gap.

Step #4
Return to the crisscross or “X” pattern lacing above the gap until complete and tie laces into a bow knot.

WIDE FOOT

Designed to open up the front of the shoe to create more space for wider feet or extra breathing room for runners. Note: The example below creates extra space up to the third eyelet, but it can be made as large as needed.

Step #1
Lace the bottom eyelet(s) until you have an equal amount of lace on the left and right.

Step #2
Run the right and left laces along the inside of the shoe and into the second eyelet. Then repeat this step to the third eyelet, giving you plenty of room in the front of the shoe.

Step #3
Begin lacing as you normally would in a diagonal “X” pattern with the right lace crossing to a left eyelet and the left lace crossing over to a right eyelet.

Step #4
Continue the “X” pattern all the way up to the final eyelets and tie the laces.

NARROW FOOT

Is your foot sliding around inside your shoe? Are they laced up tight and still not tight enough? If so, there’s a good chance you’ve got narrow feet and need a lacing style that’s a little more snug.

Step #1
String the lace through the bottom eyelet, until the length of the left and right shoelaces match.

Step #2
Thread the right and left laces back and forth in a traditional crisscross “X” pattern. Continue until you reach a middle eyelet.

Step #3
Skip a middle eyelet, leaving them empty, and resume the crisscross pattern on the next available eyelet.

Step #4
Continue the crisscross pattern all the way up and tie the laces off at the top of the shoe.

DIAGONAL LACING

Having a bruised big toe or sore toes after a long run is a common problem experienced by runners. This technique alleviates pressure and pain points by lifting the toe cap on your shoe to free your toes and gain natural motion of your foot.

Step #1
Start with one end of the lace in the top eyelet, leaving enough lace to tie still your shoe, then run it diagonally down to the bottom eyelet above your big toe. Note: The diagonal lace will be mirrored on the opposite foot.

Step #2
From the bottom eyelet next to your big toe, thread the shoelace to the opposite bottom eyelet.

Step #3
Next, thread the lace diagonally across to the next open eyelet. Then thread it straight across to the opposite side and through the adjacent eyelet.

Step #4
Continue stringing the shoelace, diagonally into the next available eyelet and straight across to the adjacent eyelet until reaching the final eyelet. Finally, tie the laces together at the top of the shoe.

RUNNER’S LOOP

Runner’s Loop or heel-lock lacing is an incredibly common technique for runners because it creates a super-tight finish that prevents your heel from slipping. For trail and/or long-distance runners, this style is an extremely helpful way for your shoes to stay tight even while running on uneven surfaces.

Step #1
Create an equal amount of shoelace on the left and right side of the bottom eyelet.

Step #2
Take the left lace across to the next available right eyelet and the right lace across to the next left eyelet in a diagonal “X” pattern. Continue crisscrossing the laces until the top two eyelets.

Step #3
Before the final eyelets, take each lace directly up to the eyelet above on the same side of the shoe – threading from the outside-in to create a loop.

Step #4
Run the laces straight across and through the adjacent loop; pull tight to lock your heel as you tie the laces into a simple bow as you normally would.

You May Also Like:

Categories
Lifestyle Tips & Tricks

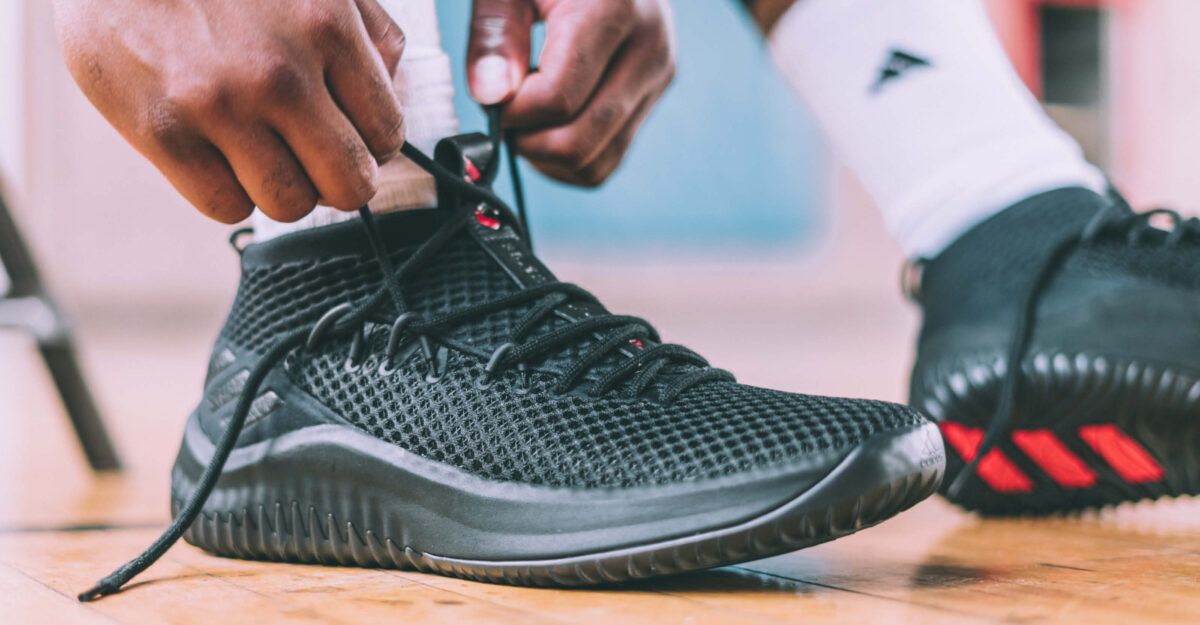
How To Lace Basketball Shoes

Knowing how to lace basketball shoes specific to your arch can be a game-changer in dominating the court. It’s a final check to know your style is on point starting from your feet up, and to ensure you’ve got head-to-toe handles like a certain point-god whose uncanny control and otherworldly movement calls for locked down lacing.

From left over right to right over left, to different tensions and various ties, laces let you curate your fit and control your style, giving you James Harden-esque possession of your own unconventional creativity. Wear them tight for more control or loose for more comfort and less constriction on high arches – it comes down to your style, your feet and what works best for you.

LACE BASKETBALL INSTRUCTIONS

When you’re learning how to do it, follow these steps:

CRISSCROSS LACING FOR HIGH ARCHES

Basketball is lightning fast with players racing up and down the court at breakneck speeds before stopping and cutting on a dime. These quick stop-and-start movements can place an excessive amount of strain on feet with high arches, leading to severe pain and instability. Make sure you’ve got the support you need when you’re hitting the hardwoods with this high-arch lacing style.

Step #1
Start by threading the lace through the bottom eyelets until there is an equal amount on either side of the shoe.

Step #2
Thread your left lace through the right eyelet and right lace through the left eyelet, creating a crisscross “X” pattern. Continue this pattern for the next two eyelets.

Step #3
At the center of the shoe, skip two or three eyelets.(whichever is needed to remove pressure on the top of your arch and offers the most comfort). Then return to the crisscross “X” pattern of lacing at the fourth. and or fifth eyelet and continue until you reach the top.

Step #4
To ease pressure on the bridge of your foot, tie and tuck the laces behind the tongue.

CRISSCROSS LACING FOR LOW ARCHES

Having low arches or flat feet can be an advantage on the court or a burden. On one side, they’re more flexible and lower to the ground allowing quicker cuts and freer movement. On the other side, the impact from every rebound, layup and jump builds up over time causing sore feet, strained arches and heel pain. But with this lacing style, your heel will be locked down, so you can stay in the game.

Step #1
Start by stringing the shoelace through the first eyelets until you’ve got an equal amount of lace on each side.

Step #2
Thread the left and right laces back and forth in a familiar crisscrossing “X” pattern all the way up the shoe until the last two eyelets.

Step #3
Next, take each lace up to the final eyelet directly above – instead of crossing. Once you’ve threaded these last two eyelets, leave a loop and don’t pull tight.

Step #4
Finally, cross the laces once more by threading the left lace through the right loop and the right lace through the left. Pull tight and tie in a double knot (this results in a tighter feel and a locked heel). Tuck in the bow or keep it short to prevent tripping.

You May Also Like:

Categories
Lifestyle Tips & Tricks

How To Lace Cleats

From youth sports to amateur and professional levels, it’s important for every athlete to know how to tie cleats with a Lock Lace for their best fit. This style modifies a traditional crisscross lacing or “X” pattern to make a serious impact on your comfort, safety and performance on the pitch, the diamond or the gridiron.

Finding the fit for your game comes down to two factors: the perfect tightness and freedom of motion. Take control of your style by giving yourself 20 minutes to lace up and test your cleats before playing so you don’t have to make adjustments on the fly. Get your lacing locked down and you can play locked in.

LACE CLEATS INSTRUCTIONS

When you’re learning how to do it , follow these steps:

LOCK LACING

Step #1
First, string the lace through the bottom eyelets and create an even amount of shoestring on the left and right sides.

Step #2
To create a common crisscross and “X” pattern, take the left and right laces diagonally across each other to the open and adjacent eyelet. Work your way up to the final two eyelets.

Step #3
Instead of crisscrossing the laces, run each lace up the same side into the eyelet above, threading from the outside of the shoe to the inside, creating a loop.

Step #4
Cross the laces and run them through the adjacent loop. Pull tight and tie cleats as you normally would (for example: bow tie knot).

Step #5
Tuck any remaining or extra lace slack into the empty space between your ankle and shoe.

You May Also Like: